



Background
When applying photography concepts to thermography, the focus is on presenting factual information through clear thermal patterns and facilitating temperature measurements. The thermal image should have suitable image detail, displaying the object at an appropriate size and position. External illumination is not necessary in thermography as the camera records both emitted and reflected radiation. Adjusting the displayed temperature interval helps control brightness and contrast in the image. Editing possibilities exist in thermography, but not all settings can be changed, and not all image errors can be corrected.
Environment Preparation - Active Thermography
Active thermography technology involves applying external energy to objects or processes to induce temperature changes, which are then analysed using an infrared camera. It is a viable non-destructive testing method for objects or scenes without natural thermal variations. In other words, no natural temperature difference is present in the object or scene.
Active thermography technology plays a crucial role in detecting leaks in cold water pipes or water seepage in external walls of buildings. By applying external energy, such as observing during times of significant temperature differences (e.g., morning and evening) or using a heat source to heat suspected leak areas, active thermography can help detect the location of leaks and water damage.
For example, consider locating a leak in a cold water pipe within a building's interior wall. When observing the wall using an infrared camera, it is often challenging to observe significant thermal contrast in the generated thermal image. However, by using an external heat source (such as observing during times of significant temperature differences, using halogen lamps to heat the surface, or injecting hot water into the cold water pipe), we can create temperature variations caused by different materials' heat absorption capabilities. This may allow us to observe temperature changes caused by the leak's location. The surface temperature of the wall at the leak point may differ from the surrounding area, which can be detected using active thermography technology.

Unchangeable features for taking good thermal images
1. IR Resolution
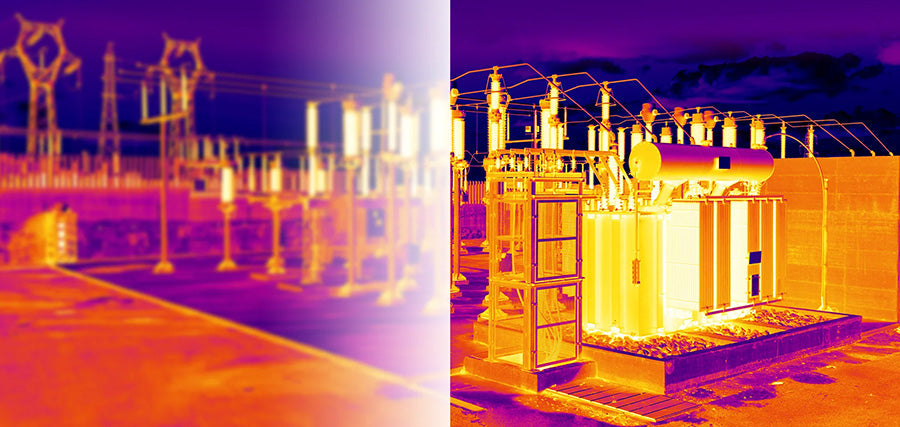
IR resolution is usually the first specification people evaluate when selecting a thermal imaging camera because it determines image detail and measurement performance. Low IR resolution detectors produce more blurred or "grainier" images, giving the impression that they are not focused. Resolution is based on the number of detector elements on the focal plane and is usually expressed as pixel count or with horizontal and vertical resolution, such as 160x120. A 160x120 camera has a detector with 160 pixels across, 120 pixels tall, and a pixel count of 19,200 pixels. Another standard resolution is 384x288 (110,592 pixels). Higher IR resolution improves image detail and the ability to measure targets, even small ones, from farther away. The image below clearly shows the difference between these image resolutions.

2. Visual Camera Resolution
Many thermal cameras also include a built-in visual camera. A low-resolution optical camera is helpful to add graphic detail to the thermal image with Picture in Picture or Fusion modes. Look for higher resolution cameras such as 8 MP if you plan to include high-quality visual and thermal images in your reporting. The ease of taking both the thermal and the visual pictures simultaneously will save you time in the field and in your reporting.
3. Temperature Range
When using hand-held uncooled microbolometer cameras, the temperature range must be appropriately selected to match the amount of incident radiation. If the temperature range is too low, the image will be oversaturated, while a range that is too high will result in an underexposed thermal image. To capture an accurate image or temperature measurement, the lowest possible temperature range should be selected, including the highest temperature in the image. Some camera models can display overdriven and underdriven areas in contrasting colors, depending on the configuration options.
4. Focus
An out-of-focus image will blur background temperatures with the target being measured and can lead to significant error. Focus is an important feature that expands the versatility of the camera. There are three types of focus - Fixed(focus-free), Manual, and Auto - each with a specific purpose. Fixed focus reduces cost and complexity and offers less clarity over the working distance. Fixed-focus cameras can be a good choice for technicians who need quick measurements while working close to equipment or when detailed reporting is not required. On the other hand, manual focus and autofocus provide sharp images over a broader range of distances with noticeable improvements in image quality. The quality and type of lens, combined with the ability to manually or automatically adjust the focus, determine not only image clarity but also measurement precision.

5. Distance
Generally, the camera has no maximum distance limitation, but it's important to note that the size of the measurement spot will increase as you move further away from the surface being measured. To ensure accurate measurements, thermal cameras function as optical systems and require adequate resolution (pixels) on the area being measured. Smaller targets or longer distances require higher resolution and narrower field of view (FOV) optics. For the best temperature measurement accuracy, we recommend a minimum of 5x5 pixels on the area.
To help you determine the best camera and lens options for your application, we have a spot size calculator on our website. This tool allows you to calculate the field of view and measurement spot. Please visit the link below to access the calculator: https://tool.hikmicrotech.com/product-params
